How To Wire A Solar PV System In A Home.
Step-by-Step Guide for a Self-Install Solar PV System with a Hybrid Inverter in Ireland
This guide is tailored for homeowners in Ireland planning a DIY solar PV installation with a hybrid inverter. While self-installation can reduce costs, it requires technical skills and adherence to legal, safety, and regulatory standards. For electrical work, consider engaging a certified electrician for compliance with Irish regulations.
1. Initial Preparation
Step 1.1: Assess Feasibility
• Energy Audit: Review your energy usage from electricity bills to calculate average daily consumption (in kWh).
• Site Conditions: Check roof orientation, angle, and shading. South-facing roofs with a tilt of 30–40° maximize solar capture.
• Budgeting: Estimate costs for panels, inverter, battery, mounting system, wiring, and tools.
Step 1.2: Plan the System
• Decide on system capacity:
• For a 3kWp system, you’ll need about 8–10 panels (assuming 300–400W each).
• Choose components:
• Panels: Monocrystalline panels for high efficiency.
• Hybrid Inverter: Ensure it supports your battery and grid connection. Examples: Huawei, Solis, or Victron.
• Battery: Lithium-ion batteries (e.g., 5kWh or higher) for storage.
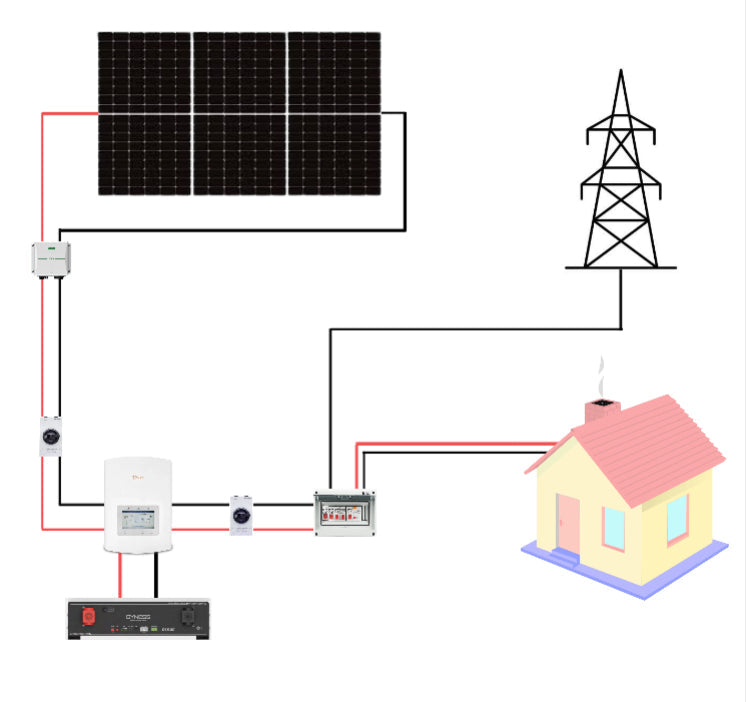
• Create a wiring diagram for connections between panels, the hybrid inverter, battery, and the home’s distribution board.
Step 1.3: Tools and Materials
• Tools: Drill, screwdrivers, cable crimper, multimeter, ladder, safety harness, and PPE.
• Materials: Solar cables, MC4 connectors, DC isolator, AC isolator, mounting brackets, rails, and grounding equipment.
2. Regulatory Requirements
Step 2.1: Planning Permission
• In most cases, domestic solar installations are exempt from planning permission.
• Exceptions include:
• Buildings in conservation areas or protected structures.
• Systems that exceed permitted development limits (e.g., roof-mounted systems over 12m²).
Step 2.2: ESB Networks Application
• Submit the NC6 form to ESB Networks for systems under 6kWp on a single-phase connection. This notifies them about your intention to connect to the grid.
• If your system is larger, you’ll need to complete the NC5 form.
Step 2.3: Compliance with Electrical Standards
• Ensure all work complies with Irish regulations, specifically the ET101 National Rules for Electrical Installations.
• Arrange for a qualified electrician to inspect and certify the system after installation.
3. Installation Steps
Step 3.1: Roof Preparation
1. Mark Panel Locations: Lay out the area for the panels to ensure they fit and are not shaded.
2. Install Mounting Brackets:
• Fix brackets securely to rafters, ensuring alignment and spacing.
• Seal all roof penetrations to prevent leaks.
3. Attach Rails: Mount the rails to the brackets and check they are level.
Step 3.2: Panel Installation
1. Secure the panels to the rails using clamps.
2. Connect panels in series or parallel depending on your inverter’s input voltage and current range.
3. Use MC4 connectors for waterproof connections.
Step 3.3: Inverter and Battery Installation
1. Mount the Inverter: Choose a cool, ventilated, and accessible location, such as a utility room or garage.
2. Connect Panels to the Inverter:
• Use a DC isolator between the panels and inverter.
• Follow the wiring diagram to connect positive and negative terminals.
3. Connect the Battery:
• Follow the manufacturer’s instructions to connect the battery to the hybrid inverter.
• Use proper cables and connectors to avoid overloading.
Step 3.4: Electrical Connection to the Home
1. Install AC Isolator: Between the inverter and the distribution board, install an AC isolator for safety.
2. Connect to the Distribution Board:
• Install a new circuit breaker for the PV system.
• Route AC cables from the inverter to the breaker.
• Label the system to indicate it includes solar power.
Step 3.5: Grounding and Surge Protection
1. Ground the panels, inverter, and battery using proper grounding rods and cables.
2. Install surge protection devices to protect against voltage spikes.
4. Testing and Commissioning
Step 4.1: Pre-Power Checks
• Inspect all wiring connections and ensure there are no loose cables.
• Verify that isolators are functional.
• Check polarity of DC cables using a multimeter.
Step 4.2: System Activation
1. Power on the hybrid inverter.
2. Test the battery to ensure it charges and discharges properly.
3. Monitor solar generation through the inverter’s display or app.
Step 4.3: Certification
• Arrange for a registered electrician to inspect and issue a Certificate of Compliance for the system.
• Submit this certificate to ESB Networks to complete the grid connection process.
5. Maintenance and Monitoring
• System Monitoring: Use the inverter’s app to track energy production, battery charge, and grid usage.
• Cleaning Panels: Clean panels annually or as needed to remove dirt and debris.
• Battery Care: Avoid deep discharges to extend battery lifespan.
Key Tips for Self-Installation
• Safety First: Always use proper safety equipment when working at heights or with electrical systems.
• Consult Experts: For electrical connections and regulatory compliance, always involve a certified electrician.
• Research and Plan: Review installation manuals and watch tutorials for your specific components.
• SEAI Grants: Even for self-installations, you may qualify for SEAI grants, provided the system meets their criteria and is inspected by a registered contractor.
Summary
A self-installation of a solar PV system with a hybrid inverter in Ireland requires careful planning, compliance with regulations, and technical knowledge. By following these steps, you can achieve a functional and cost-effective system while maximizing your home’s energy independence. Always prioritize safety and professional certification for grid connection.